Xây dựng ứng dụng để 02 thiết bị android có hỗ trợ NFC giao tiếp với nhau không sử dụng Android Beam.
Tác giả: Đặng Nhật Thiên.
Mục đích: Nội dung của bài viết này giúp chúng ta tìm hiểu module NFC – Host base Card Emulation. Bài viết sẽ hướng dẫn cách xây dựng 02 ứng dụng android chạy trên 02 thiết bị android có hỗ trợ NFC để thể hiện cách giao tiếp mà không cần sử dụng Android – Beam.
Bài viết được chia làm 2 phần
· Phần 1: Xây dựng ứng dụng cài đặt HCE Service (tạm gọi máy Client). Ứng dụng này sẽ giúp thiết bị gửi data lên máy Reader.
· Phần 2: Xây dựng ứng dụng đọc data từ máy client (tạm gọi máy Reader).
Yêu cầu về kiến thức cơ bản
· Biết lập trình Android căn bản
· Nắm vững cấu trúc của project Android.
Phần mềm sử dụng phát triển ứng dụng
· Android Studio.
Yêu cầu thiết bị
· 02 điện thoại Android có OS từ 4.4 về sau và có hỗ trợ NFC.
· Lưu ý:
o Các nội dung hướng dẫn chưa được test trên Android 6.0
o Host base Card Emulation chỉ được hỗ trợ đối với điện thoại có HĐH Android 4.4 trở đi.
Tổng quan về NFC
- NFC viết tắt của Near Field Communication. Cho phép các thiết bị hỗ trợ NFC giao tiếp ở cự ly gần.
- NFC ở Android có 3 phương thức
· Reader/Writer: cho phép điện thoại hỗ trợ NFC đọc/ghi dữ liệu lên các thẻ NFC.
· P2P: cho phép 02 điện thoại hỗ trợ NFC giao tiếp với nhau. Việc giao tiếp này được kiểm soát bởi Android Beam.
· Card Emulation Mode: cho phép các điện thoại NFC hoạt động như thẻ NFC, có thể được đọc bởi các máy NFC Reader.
Khuyết điểm của Android Beam là đòi hỏi người sử dụng phải bấm nút. Do đó, các ứng dụng áp dụng cách này sẽ tạo nên quá nhiều thao tác cho người dung trong quá trình sử dụng.
Giải thích quá trình giao tiếp giữa Reader và Client
1. Khi chạm điện thoại Client vào Reader, Reader sẽ nhận biết và gửi ‘request’ đến điện thoại Client. ‘Request’ ở đây là chuỗi byte được tạo thành từ SAMPLE_LOYALTY_CARD_AID và SELECT_APDU_HEADER.
2. Hệ điều hành Android sẽ tìm những service có đăng kí SAMPLE_LOYALTY_CARD_AID phù hợp và chuyển tiếp đến service.
3. Service sẽ tạo lại ‘request’ từ SAMPLE_LOYALTY_CARD_AID và SELECT_APDU_HEADER đã khai báo trước và so sánh với ‘request’ được gửi từ máy Reader.
4. Dựa vào kết quả so sánh, service gửi chuỗi byte kết quả về Reader.
5. Reader kiểm tra 2 byte cuối gửi từ Client. Nếu OK thì xử lý data.
Tài liệu Tham khảo
https://developer.android.com/guide/topics/connectivity/nfc/hce.html
Các bước thực hiện.
I. Xây dựng ứng dụng gửi data trên máy client.
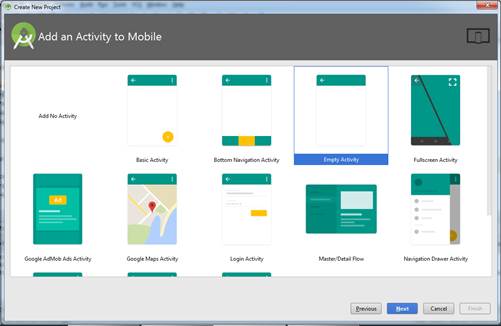
1. Tạo project với “Empty Activity” trên Android Studio.
2. Tạo java class HCEService ‘extends’ HostApduService với code như sau:
public class HCEService extends HostApduService {
private static final String SAMPLE_LOYALTY_CARD_AID = "F222222222";
// ISO-DEP command HEADER for selecting an AID.
// Format: [Class | Instruction | Parameter 1 | Parameter 2]
private static final String SELECT_APDU_HEADER = "00A40400";
// "OK" status word sent in response to SELECT AID command (0x9000)
private static final byte[] SELECT_OK_SW = HexStringToByteArray("9000");
// "UNKNOWN" status word sent in response to invalid APDU command (0x0000)
private static final byte[] UNKNOWN_CMD_SW = HexStringToByteArray("0000");
private static final byte[] SELECT_APDU = BuildSelectApdu(SAMPLE_LOYALTY_CARD_AID);
@Override
public byte[] processCommandApdu(byte[] commandApdu, Bundle extras) {
if (Arrays.equals(SELECT_APDU, commandApdu)) {
String content = "Host base Card Emulation Demo";
byte[] contentBytes = content.getBytes();
return ConcatArrays(contentBytes, SELECT_OK_SW);
} else {
return UNKNOWN_CMD_SW;
}
}
@Override
public void onDeactivated(int reason) {
}
private static byte[] ConcatArrays(byte[] first, byte[]... rest) {
int totalLength = first.length;
for (byte[] array : rest) {
totalLength += array.length;
}
byte[] result = Arrays.copyOf(first, totalLength);
int offset = first.length;
for (byte[] array : rest) {
System.arraycopy(array, 0, result, offset, array.length);
offset += array.length;
}
return result;
}
private static byte[] HexStringToByteArray(String s) throws IllegalArgumentException {
int len = s.length();
if (len % 2 == 1) {
throw new IllegalArgumentException("Hex string must have even number of characters");
}
byte[] data = new byte[len / 2]; // Allocate 1 byte per 2 hex characters
for (int i = 0; i < len; i += 2) {
// Convert each character into a integer (base-16), then bit-shift into place
data[i / 2] = (byte) ((Character.digit(s.charAt(i), 16) << 4)
+ Character.digit(s.charAt(i+1), 16));
}
return data;
}
public static byte[] BuildSelectApdu(String aid) {
// Format: [CLASS | INSTRUCTION | PARAMETER 1 | PARAMETER 2 | LENGTH | DATA]
return HexStringToByteArray(SELECT_APDU_HEADER + String.format("%02X",
aid.length() / 2) + aid);
}
}
3. Tại thư mục res, chúng ta tạo file aid_list.xml với cấu trúc thư mục như sau:
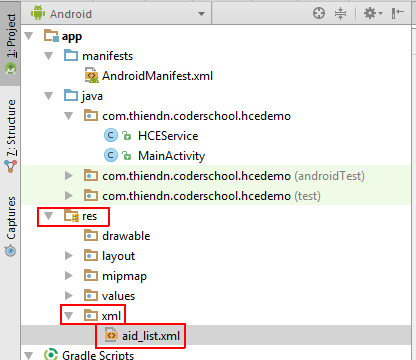
Trong file aid_list.xml, chúng ta cài đặt aid của service và loại card mà chúng ta muốn simulate. Ở đây, chúng ta chọn other:

4. Khai báo service tại AndroidManifest.

Lưu ý: Cần phải thiết lập NFC Permission cho ứng dụng để ứng dụng có thể hoạt động.

Như vậy, chúng ta đã xong bước viết ứng dụng client. Chúng ta chuyển sang bước II viết ứng dụng cho máy reader.
II. Xây dựng ứng dụng đọc data trên máy reader.
1. Tạo project với “Empty Activity” trên Android Studio.

2. Tạo java class CardReader implements NfcAdapter.ReaderCallback với code như sau:
public class CardReader implements NfcAdapter.ReaderCallback {
private static
final String TAG = "LoyaltyCardReader";
// AID for our
loyalty card service.
private
static final String SAMPLE_LOYALTY_CARD_AID = "F222222222";
// ISO-DEP
command HEADER for selecting an AID.
// Format: [Class | Instruction | Parameter 1 | Parameter 2]
private
static final String SELECT_APDU_HEADER = "00A40400";
//
"OK" status word sent in response to SELECT AID command (0x9000)
private
static final byte[] SELECT_OK_SW = {(byte) 0x90, (byte) 0x00};
private WeakReference<ReaderCardCallback> mReaderCardCallback;
public
interface ReaderCardCallback
{
void onDataReceived(String
account);
}
public CardReader(ReaderCardCallback
accountCallback) {
mReaderCardCallback = new
WeakReference<ReaderCardCallback>(accountCallback);
}
@Override
public void onTagDiscovered(Tag tag) {
Log.i(TAG, "New
tag discovered");
// Android's Host-based Card Emulation (HCE) feature
implements the ISO-DEP (ISO 14443-4)
// protocol.
//
// In order to communicate with a
device using HCE, the discovered tag should be processed
// using the IsoDep class.
IsoDep isoDep = IsoDep.get(tag);
if (isoDep
!= null) {
try {
// Connect to the remote NFC
device
isoDep.connect();
// Build SELECT AID command for
our loyalty card service.
// This command tells the remote device which service we wish to communicate
with.
Log.i(TAG, "Requesting
remote AID: " + SAMPLE_LOYALTY_CARD_AID);
byte[] command = BuildSelectApdu(SAMPLE_LOYALTY_CARD_AID);
// Send command to remote device
Log.i(TAG, "Sending:
" + ByteArrayToHexString(command));
byte[] result = isoDep.transceive(command);
// If AID is successfully
selected, 0x9000 is returned as the status word (last 2
// bytes of the result) by convention. Everything before the status word is
// optional payload, which is used here to hold data
int resultLength = result.length;
byte[] statusWord = {result[resultLength-2],
result[resultLength-1]};
byte[] payload = Arrays.copyOf(result, resultLength-2);
if (Arrays.equals(SELECT_OK_SW, statusWord)) {
String data = new String(payload, "UTF-8");
Log.i(TAG, "Received: " + data);
mReaderCardCallback.get().onDataReceived(data);
}
} catch (IOException e) {
Log.e(TAG, "Error communicating with card: " + e.toString());
}
}
}
/**
* Build APDU for SELECT AID command. This command
indicates which service a reader is
* interested in communicating with. See ISO 7816-4.
*
* @param aid Application ID (AID) to select
* @return APDU for SELECT AID command
*/
public
static byte[]
BuildSelectApdu(String aid) {
// Format: [CLASS | INSTRUCTION | PARAMETER 1 | PARAMETER
2 | LENGTH | DATA]
return HexStringToByteArray(SELECT_APDU_HEADER +
String.format("%02X", aid.length() / 2) + aid);
}
/**
* Utility class to convert a byte array to a hexadecimal
string.
*
* @param bytes Bytes to convert
* @return String, containing hexadecimal
representation.
*/
public
static String
ByteArrayToHexString(byte[] bytes) {
final char[]
hexArray = {'0','1','2','3','4','5','6','7','8','9','A','B','C','D','E','F'};
char[]
hexChars = new char[bytes.length * 2];
int v;
for ( int j = 0; j < bytes.length;
j++ ) {
v = bytes[j]
& 0xFF;
hexChars[j *
2]
= hexArray[v >>> 4];
hexChars[j *
2 + 1]
= hexArray[v & 0x0F];
}
return new String(hexChars);
}
/**
* Utility class to convert a hexadecimal string to a
byte string.
*
* <p>Behavior
with input strings containing non-hexadecimal characters is undefined.
*
* @param s String
containing hexadecimal characters to convert
* @return Byte array generated from input
*/
public
static byte[]
HexStringToByteArray(String s) {
int len
= s.length();
byte[]
data = new byte[len / 2];
for (int i = 0; i < len; i += 2) {
data[i / 2]
= (byte) ((Character.digit(s.charAt(i), 16)
<< 4)
+ Character.digit(s.charAt(i+1), 16));
}
return data;
}
}
3. Triển khai code trên MainActivity với code như sau:
public class MainActivity extends AppCompatActivity implements CardReader.ReaderCardCallback {
private TextView txtData;
private CardReader mCardReader;
private static
int READER_FLAGS =
NfcAdapter.FLAG_READER_NFC_A | NfcAdapter.FLAG_READER_SKIP_NDEF_CHECK;
@Override
protected void onCreate(Bundle savedInstanceState) {
super.onCreate(savedInstanceState);
setContentView(R.layout.activity_main);
mCardReader = new CardReader(this);
enableReaderMode();
}
@Override
public void onDataReceived(final String
data) {
System.out.println("Data from client: " + data);
runOnUiThread(new Runnable() {
@Override
public void run() {
//import
android.support.v7.app.AlertDialog;
AlertDialog.Builder builder = new AlertDialog.Builder(MainActivity.this);
builder.setTitle("Scan
Result");
builder.setMessage(data);
final AlertDialog alert1 = builder.create();
alert1.show();
//import android.os.Handler;
final Handler handler = new Handler();
final Runnable runnable = new Runnable()
{
@Override
public void run() {
if (alert1.isShowing()) {
alert1.dismiss();
}
}
};
alert1.setOnDismissListener(new
DialogInterface.OnDismissListener()
{
@Override
public void onDismiss(DialogInterface dialogInterface) {
handler.removeCallbacks(runnable);
}
});
handler.postDelayed(runnable, 3000);
}
});
}
private void enableReaderMode() {
NfcAdapter nfc = NfcAdapter.getDefaultAdapter(getBaseContext());
if (nfc
!= null) {
try {
nfc.enableReaderMode(this, mCardReader, READER_FLAGS, null);
}catch (UnsupportedOperationException e){
e.printStackTrace();
}
}
}
}
4. Cấu hình permission trên AndroidManifess.

Như vậy, chúng ta đã xây dựng thành công 2 chương trình giao tiếp NFC theo phương thức Host -base Card Emulation bằng cách đơn giản nhất.
Không có nhận xét nào:
Đăng nhận xét